Portenta H7-board

Portenta H7

The Portenta H7 follows the Arduino MKR form factor, but enhanced with the Portenta family 80 pin high-density connector. Program it with high-level languages and AI while performing low-latency operations on its customizable hardware.

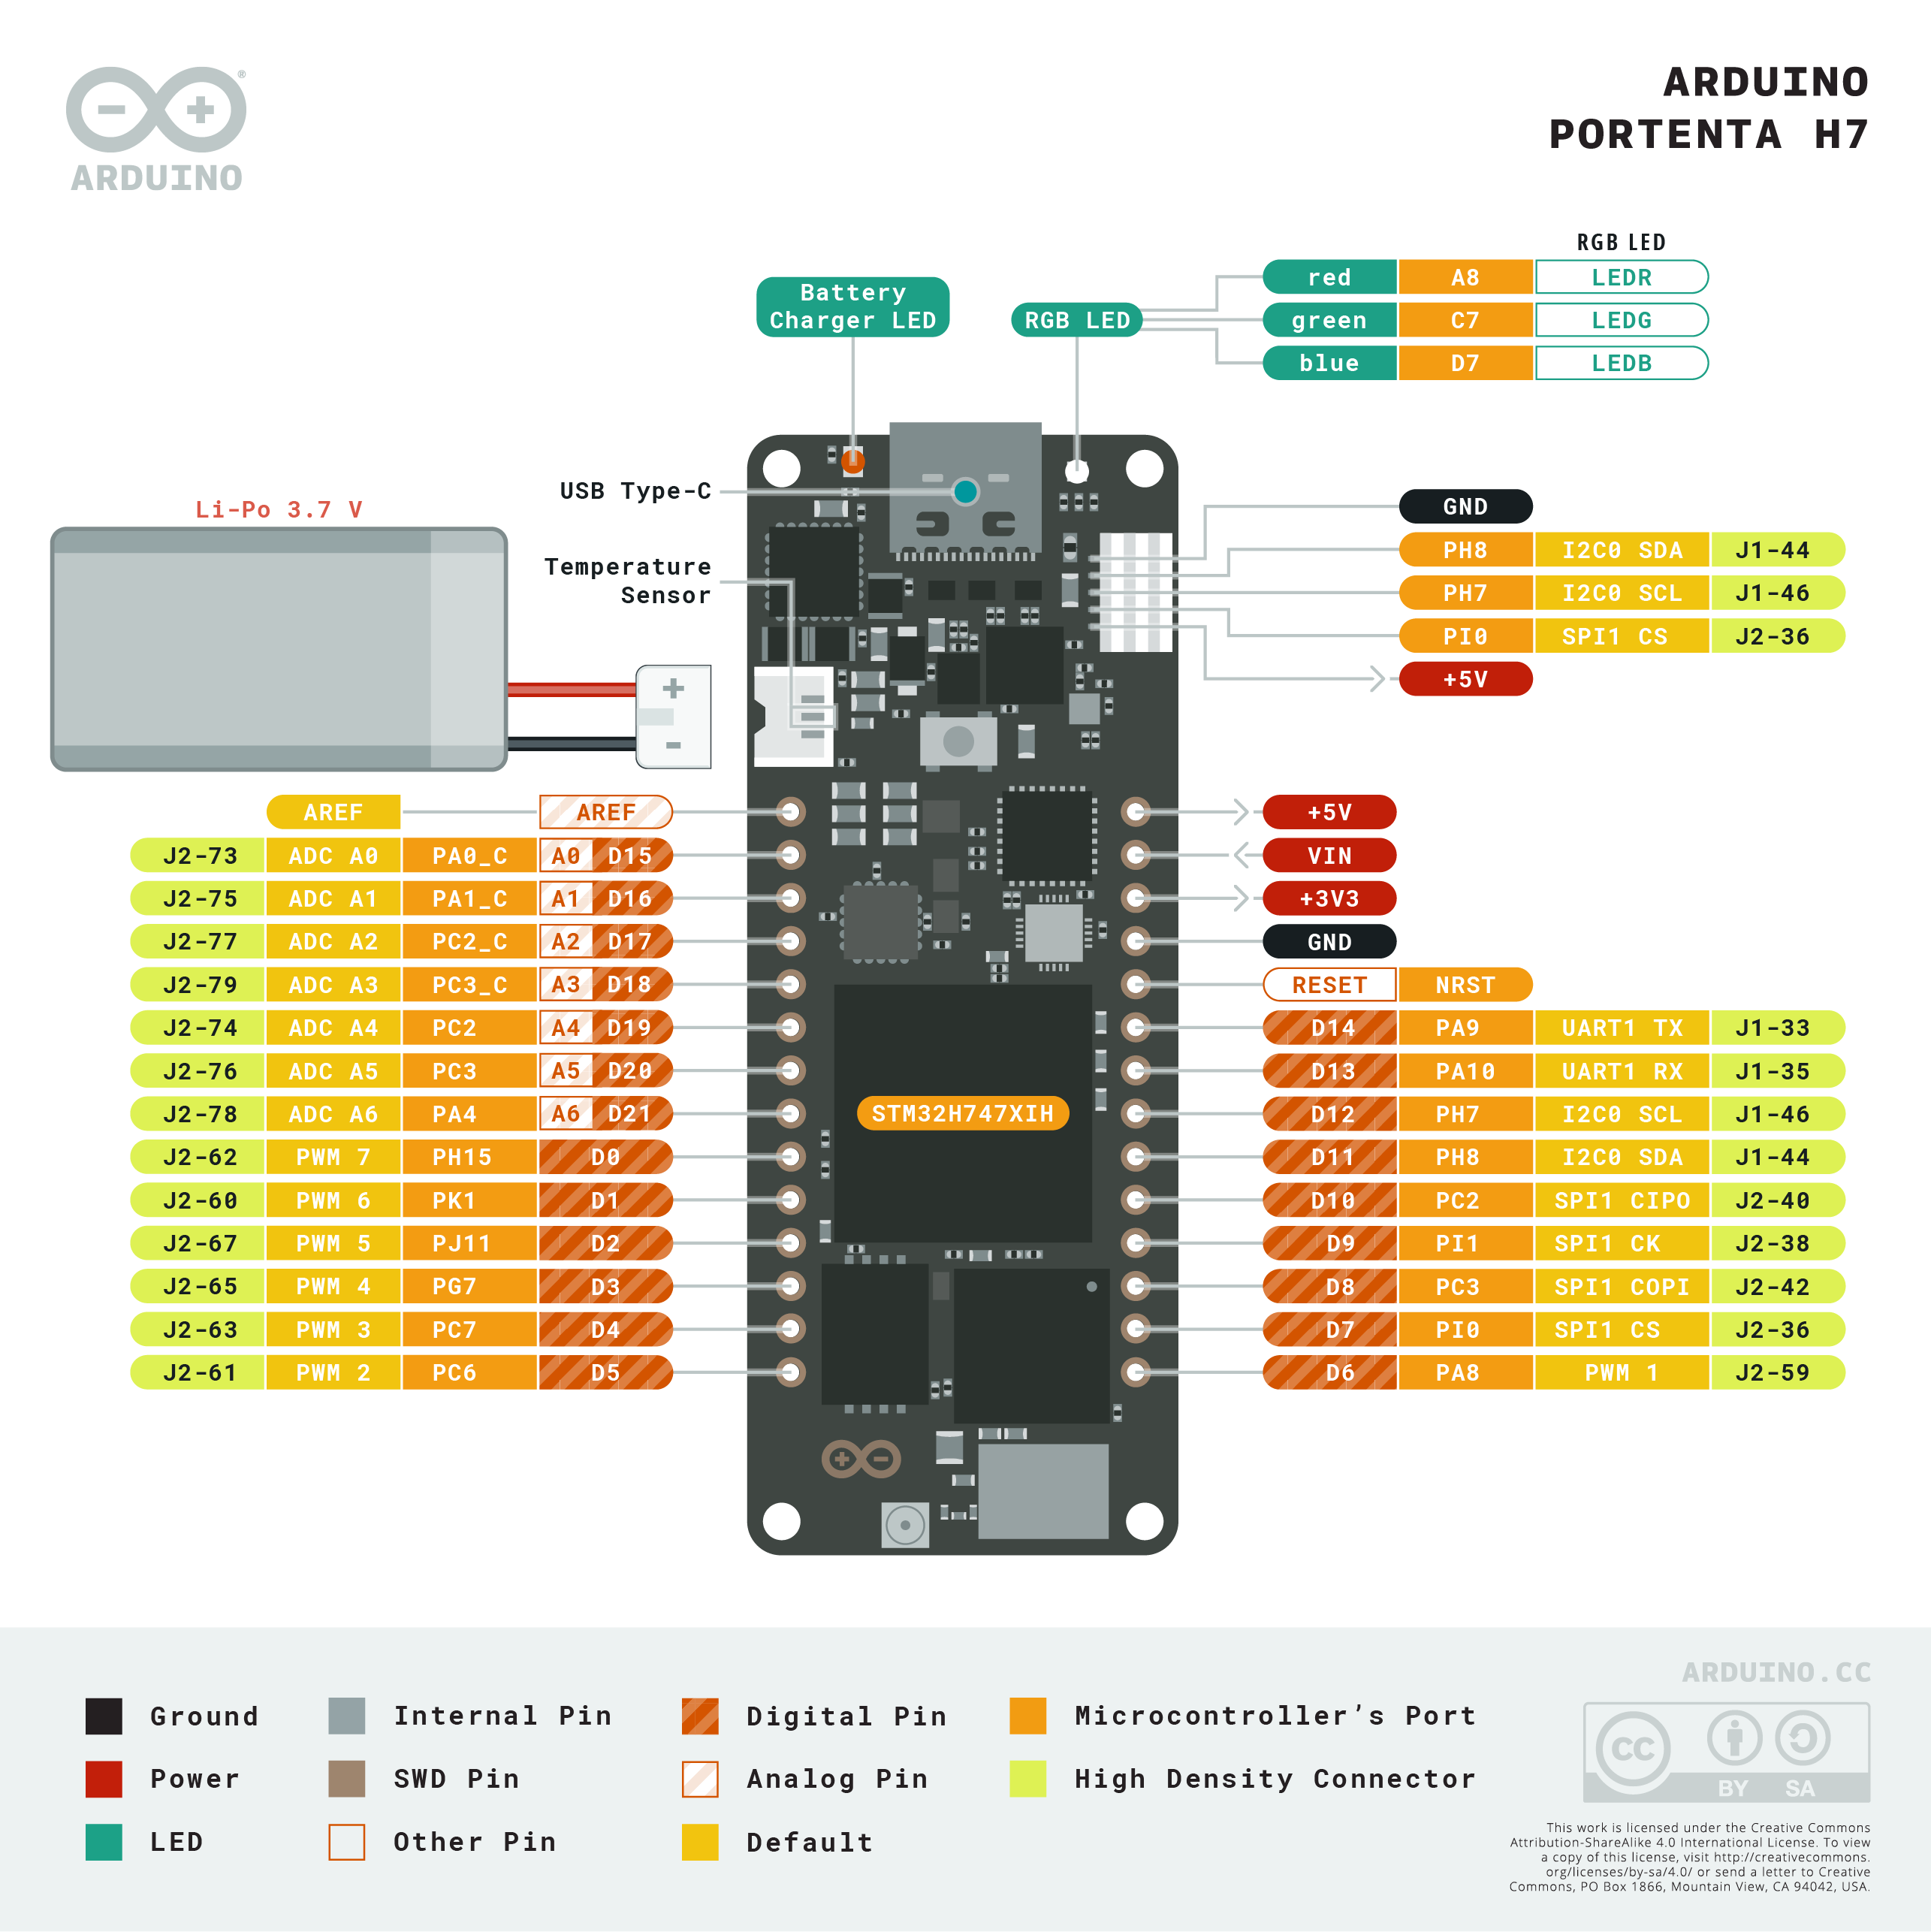
pinout

The Portenta H7 simultaneously runs high level code along with real time tasks, since it includes two processors that can run tasks in parallel. For example, it is possible to execute Arduino compiled code along with MicroPython one and have both cores to communicate with one another. The Portenta functionality is two-fold, it can either be running like any other embedded microcontroller board or as the main processor of an embedded computer. For instance, use the Portenta Vision Shield to transform your H7 into an industrial camera capable of performing real-time machine learning algorithms on live video feeds.

Nano Form Factor
Portenta H7 Microcontroller

The Portenta H7 allows for programming with high-level languages and AI while performing low-latency operations on its customizable hardware.

Microcontroller
STM32H747XI dual Cortex®-M7+M4 32bit low power Arm® MCU

H7's main microcontroller is the dual core STM32H747, including a Cortex® M7 running at 480 MHz and a Cortex® M4 running at 240 MHz. The two cores communicate via a Remote Procedure Call mechanism that allows calling functions on the other processor seamlessly.

WiFi and Bluetooth
Murata 1DX dual WiFi and Bluetooth® 5.1

The onboard wireless module allows to simultaneously manage WiFi and Bluetooth® connectivity.

Microcontroller
Chrom-ART graphical hardware Accelerator™

Probably one of the most exciting features of the Portenta H7 is the possibility of connecting an external monitor to build your own dedicated embedded computer with a user interface. This is possible thanks to the STM32H747 processor's on-chip GPU, the Chrom-ART Accelerator™. Besides the GPU, the chip includes a dedicated JPEG encoder and decoder.

Configurability
Special Configuration Request

The Portenta H7 is a highly configurable design, it is possible to order boards with different configurations of memory, crypto chip, antenna, etc. These request will be channeled through Arduino's sales team and will require a minimum amount order. We recommend you to try the default H7 configuration and, if you need specific features for your solution, then contact us to discuss the terms.

Essentials

First Steps

Quickstart Guide
A quick guide to installing your board with the Arduino IDE.

Suggested Libraries

WiFi
The WiFi library is designed to use the Murata 1DX module, which allows your Arduino to connect to the Internet.
Arduino BLE
Bluetooth® 4.0 includes both traditional Bluetooth®, now labeled " Bluetooth® Classic", and the Bluetooth® Low Energy
Arduino Pro Tutorials
The complete Arduino sketches from the Pro tutorials.

Arduino Basics

Built-in Examples
Built-in Examples are sketches included in the Arduino IDE and demonstrate all basic Arduino commands.
Learn
Discover interesting articles, principles and techniques related to the Arduino ecosystem.
Language Reference
Arduino programming language can be divided in three main parts: functions, values (variables and constants), and structure.

Tutorials

BLE Connectivity on Portenta H7

This tutorial explains how to use Bluetooth® Low Energy connectivity on the Portenta H7 to control the built-in LED using an external Bluetooth® application.

Bluetooth® Low Energy
LED
Connectivity
Bluetooth®
Creating GUIs with LVGL (V7)

In this tutorial you will learn to use LVGL (Light and Versatile Graphics Library) to create a simple graphical user interface that consists of a label which updates itself.

USB Host
LVGL
GUI
HDMI
Dual Core Processing

In this tutorial you will run two classic Arduino blink programs simultaneously on different cores of the Portenta board that blinks the RGB LED in two different colours.

Multitasking
RGB
LED
Creating a Flash-Optimized Key-Value Store

This tutorial explains how to create a Flash-optimized key-value store using the Flash memory of the Portenta H7.

Storage
Key-Value store
Flash
Getting Started with OpenMV and MicroPython

This tutorial teaches you how to set up the board, how to use the OpenMV IDE and how to run a MicroPython blink example with OpenMV.

Getting Started
OpenMV
Setup
Blink
MicroPython
Lauterbach TRACE32 GDB Front-End Debugger for Portenta H7

This tutorial will show you how to use the Lauterbach TRACE32 GDB front-end debugger to debug your Portenta H7 application via GDB on a serial interface.

Debugging
Lauterbach
TRACE32
Arduino Portenta H7 MicroPython Cheat Sheet

Learn how to set up the Arduino Portenta H7 for OpenMV. Obtain information regarding pins and how to use OpenMV and MicroPython.

Installation
MicroPython
OpenMV
Over-The-Air (OTA) Updates with the Arduino Portenta H7

Learn how to perform an OTA update of the firmware on the Arduino Portenta H7

OTA
Over-The-Air
Wi-Fi
Cloud
Reading and Writing Flash Memory

This tutorial demonstrates how to use the on-board Flash memory of the Portenta H7 to read and write data using the BlockDevice API provided by Mbed OS.

Storage
Flash
Block Device
Secure Boot on Portenta H7

Learn how to use secure boot on the Arduino Portenta H7.

Secure Boot
Setting Up Portenta H7 For Arduino

This tutorial teaches you how to set up the board, how to configure your computer and how to run the classic Arduino blink example to verify if the configuration was successful.

Getting Started
IDE
Setup
Blink
Updating the Portenta Bootloader

This tutorial will explain what a bootloader is, why you should consider keeping it updated and how you can update it.

Bootloader
Firmware
Core
Portenta H7 as a USB Host

This tutorial teaches you how to set up the Portenta H7 to act as a USB host in a way that allows to connect peripherals such as a keyboard or mouse to interact with it.

USB
HID
RGB
LED
Portenta H7 as a Wi-Fi Access Point

In this tutorial you will configure the Portenta H7 as an access point and build a simple web server that will allow you to control the built-in RGB LEDs from your mobile device.

Wi-Fi
Access Point
HTTP
Web Server

Resources

Pinout Diagram

A diagram showing the functions and the arrangement of the pins on your product.
Downloads