Servo Motor Basics with Arduino
The Servo Library is a great library for controlling servo motors. In this article, you will find two easy examples that can be used by any Arduino board.
The first example controls the position of a RC (hobby) servo motor with your Arduino and a potentiometer. The second example sweeps the shaft of a RC servo motor back and forth across 180 degrees.
You can also visit the Servo GitHub repository to learn more about this library.
Hardware Required
- Arduino Board
- Servo Motor
- 10k ohm potentiometer
- hook-up wires
Circuit
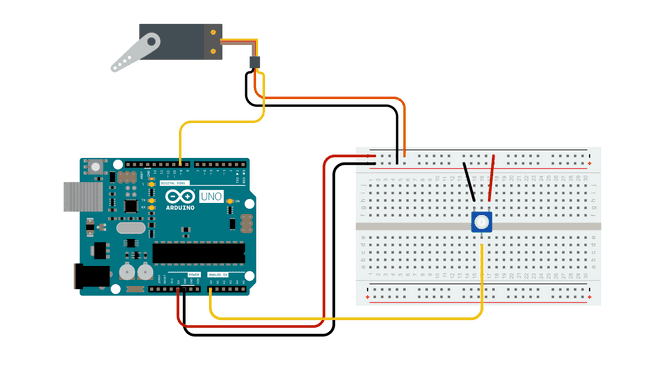
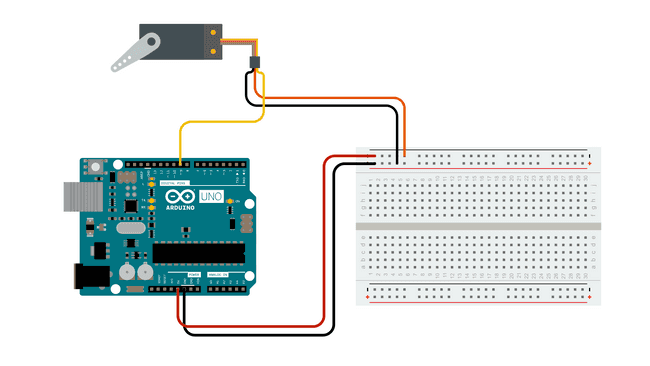
Servo motors have three wires: power, ground, and signal. The power wire is typically red, and should be connected to the 5V pin on the Arduino board. The ground wire is typically black or brown and should be connected to a ground pin on the board. The signal pin is typically yellow or orange and should be connected to PWM pin on the board. In these examples, it is pin number 9.
Knob Circuit
For the Knob example, wire the potentiometer so that its two outer pins are connected to power (+5V) and ground, and its middle pin is connected to
A0Sweep Circuit
For the Sweep example, connect the servo motor to +5V, GND and pin 9.
Examples
Knob
Controlling a servo position using a potentiometer (variable resistor).
1#include <Servo.h>2
3Servo myservo; // create servo object to control a servo4
5int potpin = 0; // analog pin used to connect the potentiometer6int val; // variable to read the value from the analog pin7
8void setup() {9 myservo.attach(9); // attaches the servo on pin 9 to the servo object10}11
12void loop() {13 val = analogRead(potpin); // reads the value of the potentiometer (value between 0 and 1023)14 val = map(val, 0, 1023, 0, 180); // scale it to use it with the servo (value between 0 and 180)15 myservo.write(val); // sets the servo position according to the scaled value16 delay(15); // waits for the servo to get there17}Sweep
Sweeps the shaft of a RC servo motor back and forth across 180 degrees.
1#include <Servo.h>2
3Servo myservo; // create servo object to control a servo4// twelve servo objects can be created on most boards5
6int pos = 0; // variable to store the servo position7
8void setup() {9 myservo.attach(9); // attaches the servo on pin 9 to the servo object10}11
12void loop() {13 for (pos = 0; pos <= 180; pos += 1) { // goes from 0 degrees to 180 degrees14 // in steps of 1 degree15 myservo.write(pos); // tell servo to go to position in variable 'pos'16 delay(15); // waits 15ms for the servo to reach the position17 }18 for (pos = 180; pos >= 0; pos -= 1) { // goes from 180 degrees to 0 degrees19 myservo.write(pos); // tell servo to go to position in variable 'pos'20 delay(15); // waits 15ms for the servo to reach the position21 }22}
